How to Make the Perfect Clay Slip for All Your Clay Projects
 For tons of helpful info for teaching with clay, check out “Creating with Clay: Tools, Techniques, and Tips for Success” in my TPT Store.
When joining two pieces of clay, you’ll have the best chance of them staying joined if you score (rough up the surfaces to be joined) and then slip (paint both scored surfaces with a pre-made clay slip). Clay can sometimes have a mind of its own so this step is a small price to pay to get successful results!
Don’t skip the slip!
But I’ll confess… when I was only teaching an occasional clay project with my classes, I would often “skip the slip” and just use water – incorrectly assuming that some “attachment malfunctions” were to be expected.
Or, if I was really prepared, I would make some clay slip before class by adding a little water to some soft clay and mixing it with a fork or a wire whisk. Then I’d store the clay slip in individual plastic containers – but it would usually dry out before I had a chance to use it again with the next project down the road.
The secret to perfect clay slip
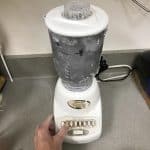
Well, I’m here to tell you there’s a better way! All you need is an old blender that you can designate for your clay slip and some plastic storage containers with screw-top lids. Plastic containers with screw-top lids work better than anything else I’ve tried to keep the contents from drying out.
Used blenders are easy to find at your local thrift store. It doesn’t even need to be very powerful. And if it already looks a little worse for the wear, all the better, since you’re not using it for food anyway!
If you have a “FreeCycle” or another type of sharing/reusing community in your area, you may even be able to find a used blender for free. (Just make sure you don’t use your good blender from home!)
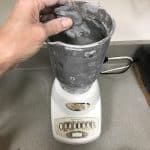
How to make your own clay slip
To make your own clay slip, simply drop some clay scraps in your blender, add just enough water to cover it, and let it sit overnight. Then blend it up the next morning. If it’s too thin, add more clay…. too thick, add a little water.
I like our slip to be thick but still pourable. (Important! Make sure your clay slip is made from the same clay you’ll be using it with!)


How to store your clay slip
For storing slip, I like the 16 oz. plastic containers with screw-on lids that come in packs of 2 from the Dollar Tree. With a screw-on lid, you can get a tighter seal than you can with snap-on lids, which means your slip will still be usable the next time you need to use it.
Rather than giving each student their own individual container of slip, I just have groups of 2, 3, or 4 all share a bigger one. Storing a larger amount of slip in a bigger container keeps it from drying out so quickly. Even after the summer break, all I need to do is stir in a little water and our clay slip is ready to go.
How to apply clay slip
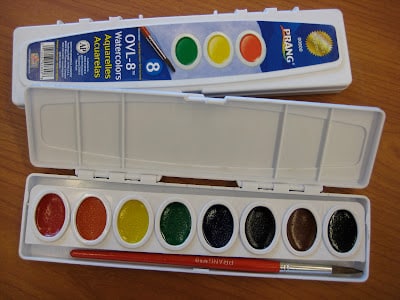
We use the red-handled paint brushes that come in the Prang watercolor sets for applying clay slip since we never use those brushes for painting. They’re just the right size for slip and the red handles make them easy to keep separate from our good brushes.
An alternative to using slip
As an alternative to using clay slip, you could try “Magic Water“. This can be purchased on Amazon or in most ceramic supply stores. This won’t be cost effective for large classes or groups of students, but it may be helpful to have on hand for special projects.
You can also make your own “Magic Water” for less by following the recipe here. But you’ll need to purchase liquid sodium silicate and soda ash at a ceramic supply store, so you may find it easier to just make slip!
Don’t forget a scoring tool
Whether you use slip or Magic Water, you’ll need to score (rough up) both surfaces before joining them. You can purchase a tool made specifically for scoring, or make a cheap and effective scoring tool by laying a few toothpicks side by side and taping them together with masking tape. A stiff toothbrush will work, too, but it takes a little more effort to clean it afterward.
Kids of all ages love working with clay! The easier you can make it on yourself as the teacher, the more you’ll enjoy it, too!
Check out my “Ceramic Leaf Plates” resource in my TPT Store for a fun project for grades 3 and up.
For lots more helpful info for teaching with clay, check out “Creating with Clay: Tools, Techniques, and Tips for Success” in my TPT Store.


You don’t need to add epson salt or anything to the slip mixture?
Nope! All you need is clay and water! :)
Do you have to leave it overnight?
You don’t need to leave this slip overnight before you use it. It’s ready to go as soon as you mix it!
Can you make clay slip from new clay
Yes, Barbara, you make it just as you would from scrap or recycled clay. Just make sure you use the same clay for your slip as the clay you’ll be using it with. Otherwise, different drying and shrinking rates can cause problems. If you work with different kinds of clay, you’ll need a different slip for each one.
How do you keep clay from drying out?
And how to you resurrect a hard package of clay?
Great questions, Lori! For work in progress, I like to spritz it with water and wrap it with thin plastic. The thin plastic bags from the dry cleaner are ideal for this. You can also wrap work in progress with damp paper towels first (before wrapping in plastic) to extend its workable time even longer.
To make small pieces of clay usable again, place them in a ziplock bag, spritz with water, seal the bag, and wait a day or two (repeat if needed).
If an entire block of clay has dried out, that’s also easy to fix! Open the bag of dried out clay and pour about a cup of water directly onto the clay and rubber band the bag closed. Then fill a 5-gallon bucket with water to a little more than halfway and lower the sealed bag of clay into the bucket. The water needs to come just over the (sealed) top of the bag. (If you notice a large air bubble at the top of the bag, let that air out and reseal it.) Now leave the bag of clay in the bucket like this for a day or two. The water pressure from outside the bag will drive the water you poured into the bag into the clay itself. So easy and effective it’s like magic! Thanks for your questions!
You don’t have to add Epson salt or anything to the slip blend?
No, you don’t need to add anything!
I learned in my ceramics class that an ounce of vinegar in your slip can breakdown the clay if you don’t have a blender.
I haven’t tried this but it sounds like it might work!
As a beginner this article was very helpful. As a potter beginner I’m taking nothing for granted. So all the little…..little details makes sense to me for success. Thank you.
Glad this was helpful, Rodney!
Hello I am new to making slip for my molds but I ran into a problem. I do not have old clay to use, how else can I make liquid clay or slip to fill my molds. I do not even have a kiln near by as both craft shops for ceramics closed. So need idea of how to cook my things when they come out of the mold.
Slip can be made the same way using new clay – by adding water, allowing to soak, and mixing well. But the slip needed for mold casting could be quite different than the slip I use for joining pieces of clay, so you will need advice from someone who is using it for that purpose. Also, you will need a kiln to fire your slip molded pieces. I recommend finding a local potter or ceramic artist who can help you. Best of luck to you!
What about terra cotta slip? What temperature to fire at? Can you use it in a mold for stepping stones?
Those are good questions, Pamela! I don’t have experience with slip casting so unfortunately I can’t help you with that. I do know there are a lot of technical considerations, like the water to clay ratio, etc. Maybe the place you buy your clay from could help you. Best of luck to you!
What about oil/wax clay SLIP? I cannot add water to my monster clay….
It’s really odd to me that I’ve looked pretty hard for an answer to the oil/wax based clay Slip…. Every article talks of water as an additive….
Thanks for your question, Martino! Monster Clay is a completely different material than pottery clay, which is what I’m referring to in this post. I’ve read that you can soften Monster Clay by applying a gentle, low heat and you can dissolve the surface with 99% alcohol or mineral spirits, but I’ve never worked with Monster Clay myself. I recommend contacting the Monster Clay company directly – they will be best able to answer any question you might have!
Tx for the explanation. I suppose if you make it thicker you can use it for making dots ? I’m an absolute beginner
Yes, Martine, the technique you’re referring to is called “slip trailing”. You can ‘draw’ lines, curves, and dots with the slip using a squeeze bottle or bulb. It takes a little practice but it’s a fun way to make a raised design or texture.
Hello, Cheryl! I cam across your lovely article about clay slip and I could really use your valuable help. Does your advice apply to air dry clay or clay that needs firing? I work with air dry clay and I have tried lots of times to make a Teapot miniature. Oh it was impossible to add the handle. ?The handle could stay attached to the body. So I was wondering, what if added some pva glue to the slip mixture? ?
I could really use your help, so please get back to me. Looking forward to your reply!
Thank you in advance! Lori
Hi Lori. Thanks for your great question! The slip I’m talking about in this post is for pottery clay (that needs firing), not air dry clay. But you can totally make your own slip for air dry clay, too! I would make just a small amount at a time. Here’s what you do: Put about a tablespoon of water into a small jar or plastic container with a tight-fitting lid. Then pinch a small amount of your air dry clay between your fingers until it is very thin, like paper, and tear off small bits of it and drop it into the water. Then swirl the water around in the container to coat the clay. Continue pinching and tearing small bits of clay and adding them to your water. Make sure to keep the clay bits wet. You can add more water in tiny amounts as you need to – an eye dropper works great for this. Then let your mixture soak for a few hours to overnight, stirring it occasionally. I like to use a popsicle stick or a plastic fork to stir it. Leave the lid off while the clay bits soak in the water. When the clay has mostly dissolved, you can use a tiny whisk to make it really creamy if you want to. Or just stir it a lot with whatever you’re using to stir it. I like the consistency to be similar to sour cream when I use the slip. Then you can store it with the lid on to keep it from drying out too fast. Good luck with your teapot project… I hope this helps!
Oh thank you kindly!!! Yes, it does help a lot!!! You are so kind and lovely to reply to me!
Blessings!!!! ??
You’ll get a much better result if you use “magic water” instead of ordinary tap water.
Thanks for your comment, Suzanne! I added a bit about Magic Water to my post. Magic Water is especially helpful for repairs to leather hard and sometimes even bone dry clay pieces, like when a handle or other joined area starts to form a crack.