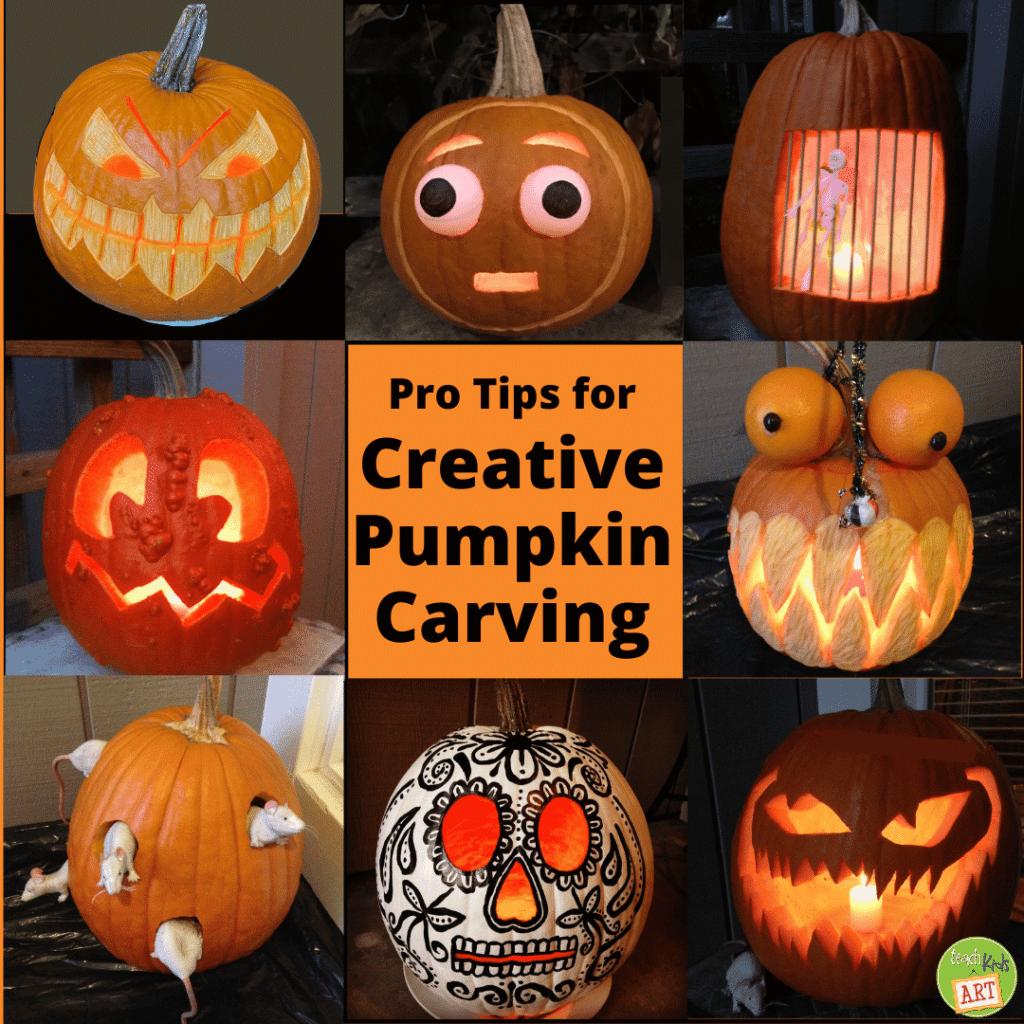
Pro Tips for Creative Pumpkin Carving
Pumpkin carving is one of the most creative and fun traditions of the fall season. Whether you’re a seasoned carver looking for tips, or helping kids carve their first pumpkin, this post is for you. Choosing the right pumpkin and following a few helpful ideas can make all the difference in bringing your design to life.
In this guide, I’ll walk you through how to select, prepare, and carve your pumpkin like a pro. Get ready to unleash your imagination and craft a creative jack-o-lantern to light up the night!
Pro tips for creative pumpkin carving
1. Choose your pumpkin with intention.
Choose a pumpkin that fits your design.
Do you already have a design in mind or a pattern you want to use? What pumpkin shape would work best with that design… round, tall, wide at the bottom, or …?
Another approach is to choose a pumpkin that inspires you – maybe it has an unusual shape or a unique stem. A stem with “personality” will add to the character of your design. Then create your design specifically for that pumpkin. Either approach will work!
Just make sure your pumpkin is large enough to accomodate the features you want to include.
Choose a pumpkin that feels light for its size.
If a pumpkin feels heavy for its size it probably has very thick walls. This will make it difficult to carve and will block more of the light from your candle. And if any of the shapes you’re cutting are small, thick walls will really get in the way. A pumpkin with thinner walls will be easier to work with and won’t hinder your candle’s glow.
Choose a pumpkin that is fairly smooth, without any deep ridges.
A pumpkin with deep ridges or lots of bumps may look cool, but it will be hard to transfer your design evenly or carve smooth lines. These pumpkins can have a ton of personality, but for carving they’re not the best. So consider grouping these pumpkins (uncarved) among your carved pumpkins for added interest. Or create a design that features the bumps but avoids carving through them.
Choose a pumpkin that looks fresh
Carefully check your pumpkin for any dings or bruises, as these will affect how long it will last. Its stem should be intact and still look a little green, if possible. (Remember to always pick up your pumpkin by lifting it from the bottom… NEVER by its stem. But if your stem does happen to pop off, try re-attaching it with hot glue.)
2. Prep your pumpkin.
Start with a clean pumpkin! Wipe down your pumpkin with a little dish soap and water using an old towel or microfiber cloth before you begin. Then be sure to dry it well.
Cut a small circular opening at the base of your pumpkin, around the blossom end, before it starts to curve upward. The stem preserves the structure of your pumpkin, so leave it intact and cut your opening at the bottom instead.
Make sure this opening is just a little larger than your fist, then save this bottom piece to hold your candle. Your pumpkin should rest firmly on its base without wobbling.
Now, push up your sleeves, reach in, and remove all the seeds and “goop”. (I like to wear disposable “medical” gloves for this.) Save the seeds if you want to roast them. Then use a scraper tool or sturdy spoon to further clean and smooth your hollowed-out pumpkin. Pat the inside dry with a paper towel.
3. Draw or transfer your design.
To draw your design freehand, use a washable marker or white oil pastel. Any marks left showing after you cut away your design can be easily wiped off with a soft microfiber towel. This won’t leave stains or indentations on your pumpkin like drawing with a Sharpie or a pencil would.
To transfer a design from a pattern or a separate drawing, cut your design apart into individual sections so each piece can lay flat. (i.e. eyes, nose, mouth, all separate) Then tape these sections where you want them to go (any kind of tape will work).
Next, use a pin or an awl to carefully poke some small holes along your cutting lines. You can also use a tracing wheel tool to poke holes along your lines to transfer your design from paper to pumpkin.
4. Carve your pumpkin.
I recommend using a set of safe carving tools like this one, even if adults will be doing the carving. These tools are so much safer and you’ll be able to cut more detailed designs than you could with a regular knife. The smaller tools do tend to break if you’re not careful, so you may want to have a couple of sets on hand, just in case!
Not every part of your design has to be cut all the way through. Try using a linocut tool for intricate designs that let a little light through while keeping your pumpkin’s structure intact. I also like to use my linocut tool to “pre-carve” the main areas of my design.
It’s also a good idea to set your pumpkin in a bowl to cradle it in place while carving, so it doesn’t roll off the table. (I learned this the hard way!)
As you cut sections away, try to leave them in place until all your cutting is done. This keeps the walls of your pumpkin strong and less likely to break or crack while you’re working on it. Then remove all of the cut-away pieces at the end when you’re finished.
5. Let your imagination go…
Consider adding some fun props to your pumpkin, like ping pong balls for eyes, or rubber mice crawling through holes. Try carving some areas only partially through, to add details and contrast. You can also add more involved designs with acrylic paint. As you can see, the sky’s the limit here… have fun with it!
6. Light it up!
A pumpkin becomes a jack-o-lantern when you light it up. I like to light ours with short, chunky candles in clear glass like these long burning votive candles. The glass containers just feel safer to me, and your creation will stay lit throughout the evening.
Or, you can use LED candles, but they won’t be as bright so you’ll need more of them to equal the same output of light. One nice feature of these is that they have a timer so you won’t have to remember to go out and turn them off.
When you’re ready to display your carved pumpkin, choose a spot out of direct sunlight. Then set it on a plastic plate. That way if it begins to rot, the mess is contained and it will be easier to clean up. You can use an upside down flower pot as handy display stand, too.
Pumpkins make a unique “canvas” for showcasing your creativity. These tips will have you carving pumpkins like a pro in no time!