Watercolor Fish with Pointillism
Painting in the Style of Georges Seurat – Watercolor Fish with Pointillism
Kids are naturally intrigued by pointillism – it just looks fun! But painting with very small dots can quickly become tedious and frustrating for them because the progress is so slow. If you’ve ever tried using the tips of markers to teach a pointillism lesson, you know what I mean!
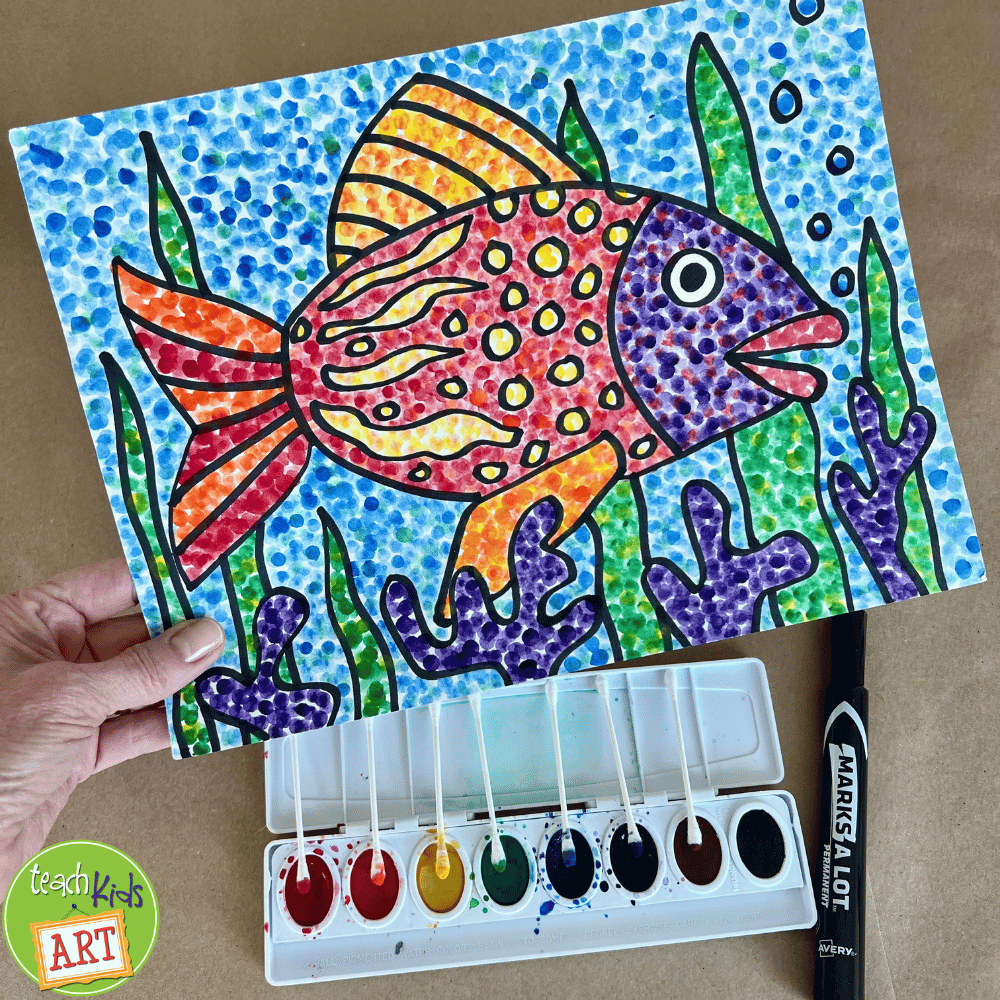
This fun project, Watercolor Fish with Pointillism, turns the frustration kids often feel with Pointillism into excitement. The difference is in the size of the dots! Rather than the tedious filling in of areas with very small dots, have kids use Q-Tips to “paint” their dots instead. A coloring book style drawing with a heavy outline to fill in is a great way to start. I like to use fish as a subject for these pointillism paintings, but flowers, bugs, or birds would work well, too.
 Painting in the Style of Georges Seurat – Watercolor Fish with Pointillism
Materials:
- 9×12 white heavyweight construction paper or watercolor paper
- Black chisel tip marker (permanent)
- Prang OVL-8 Watercolor set
- Q-tips (at least 7 per student)
- Containers for water
- Photos or line drawings of your subject for visual reference (various types of fish were used for inspiration here)
- Examples of the paintings of artist Georges Seurat (in books or online)
Directions:
1. Explain what “Pointillism” is and talk about the work of Georges Seurat. Show examples of his paintings. Provide several visual references of interesting fish shapes for students to draw.
2. Lightly sketch the outline of your subject, filling most of your paper. Include smaller shapes within larger shapes to paint with different colors. Add a few other elements to the background (in this case, the fish’s habitat, such as kelp, rocks, shells, etc.). Keep in mind that your shapes need to be large enough to be painted with Q-tip dots!
3. Trace over your pencil lines with a black, chisel tip marker to create a bold “coloring book” style drawing.
4. Add a drop of water to each of the colors in your paint set to moisten them. Or, you can spritz the colors in each set with a small spray bottle. (You will not be needing the black in your set, so for younger kids, you might just want to remove those – they easily pop in and out!)
5. Dip each of your 7 Q-tips in water and lay them along the edge of your paint set, each one resting in it’s own color.
6. Now fill in each section of your drawing with dots of color by dipping your Q-tip in the paint and then pressing it onto your paper. Cover each area with a “light sprinkling” of dots at first. Then go back and fill in with more dots as needed. You can “mix” colors visually by combining dots of different colors within the same section. Try to let the first color dry before adding the next color, to keep your Q-tips clean!
Encourage students to take their time and work carefully, placing one dot of color on their paper at a time. You don’t have to dip your Q-tip in paint for every dot. Making several “dots per dip” will yield a lighter, more transparent color.
This project usually takes one session for drawing and one session for painting. Kids love painting with Q-Tips and will be asking to do pointillism with their watercolor sets again and again.


Great great project! Thanks for sharing.
I recently finished this project with my 5th graders and they were amazing!!! I loved that I didn't even have to use watercolor paper. It did take way longer than 2 class period, but was well worth the effort. Thanks for a fabulous blog with wonderful projects!
it was brilliant!
pointillism was my class' favourite type of art, they even wanted to do it again after we finsihed!
They all looked so pretty!
Hello everybody,
What age group the class is suitable?
Thanks
Gabriela
I’ve usually done this lesson with 4th graders, but it really depends on your class and whether you do it early in the school year or in the spring. Younger kids could do well with it if you cut the paper smaller… it really just comes down to having the patience to make all those little dots! :)
Thank you for this fun project! Completed this with my kids today – 10, 8, and 5. They did a great job and really enjoyed it!
So glad everyone enjoyed it, Kristi! Thanks for your feedback!!