TeachKidsArt

a resource for teachers & families

  • Home
  • Blog
  • Artist Birthdays
  • SHOP TPT
  • About
  • Contact
  • TIP Vault

Butterfly with Watercolor & Oil Pastel Resist

By Cheryl Trowbridge 1 Comment

Share
Pin
Tweet
Print

Butterfly with Watercolor and Oil Pastel ResistFall is “butterfly season” for us who live on the California Central Coast! This is the time when over 100,000 Monarch butterflies migrate to our State Monarch Preserve from the valley regions west of the Rockies, making their temporary home here until spring. On sunny, warm days, they fly out of the eucalyptus trees where they cluster, to the delight of onlookers…. it is quite a sight to behold! Our Kindergarten classes take a field trip to see these magnificent Monarchs each fall, so we decided to paint our own beautiful butterflies in honor of this special event!

Although our focus is on learning about Monarchs, I like to give Kinders the freedom to create either a Monarch or a colorful butterfly of their own design (most choose the latter). I put up lots of visual references for inspiration, pointing out the symmetry of both color and shape in each butterfly.

1. First, fold a 9×12 paper in half (I use heavy weight construction paper) and place it with the fold on the right. (If you’re teaching a large group, it helps to be consistent with your own demo and sample, and the orientation of the paper the students have in front of them…. so choose which side the fold will be on and keep it consistent!) Explain that you will be drawing half of a butterfly on the fold, in order to make it “symmetrical”, or “the same on both sides”.

2. With a black oil pastel, make a small half circle, about half way down on the fold. This will be the butterfly’s head. Be sure to press hard to make it nice and dark.

3. Next, draw half of the body below the head.

4. Now add the wings by drawing a diagonal line from where the head meets the body, up to the corner, then a vertical line most of the way down the side and a horizontal line straight back across to the body. Add a curved line from any point on your horizontal line down to the lower corner and curving back up to the body. (This may sound like a lot for K’s, but if you explain it as they watch you do it, it will make sense to them!)

5. Then add a design with just a few simple shapes on the wings. Don’t forget to add an antenna!

6. Next, open up your paper and fold it back over on top of your drawing and rub really hard with your hand or the back of a spoon. Your design will magically appear on the other side!

7. Your transferred design will be very faint, so now go back over it with your oil pastel , pressing hard to make your lines dark.

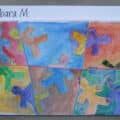
8. Finally, paint your butterfly with watercolors. Decide if your butterfly will be in the grass or the sky and make sure you use colors that will make your butterfly stand out from its background! Remember to keep your colors symmetrical from wing to wing and use enough water so that your colors look transparent.


The most challenging part of this lesson is getting students to draw on the fold. I’ve even tried taping the paper down so they can’t turn it! (If they draw on the loose edge instead of the fold, they will end up with two halves of a butterfly instead of one whole one!) I’ve also tried having the paper open when they draw their half butterfly, but most of them got so excited about their drawing that they kept going and drew both sides – which then made it not symmetrical! Your best bet will be to have a small ratio of adults to children (yay! for parent volunteers) and lots of extra paper, just in case!!


I always love how given the same set of instructions, each butterfly comes out different and unique…. the mark of a good art lesson!!

Share
Pin
Tweet
Print

You may also like...

Default ThumbnailButterfly Symmetry with Crayon Resist Default ThumbnailKindergarten Birds Default ThumbnailGrade 2 Portfolios – “My Many Colored Days” Default ThumbnailMy Good Shepherd

Filed Under: Butterflies, Crayon, Drawing, Lessons, Mixed Media, Painting, Watercolor Tagged With: butterflies, crayon resist, symmetry

Comments

  1. Char says

    at

    I have done this project with kinders, but I usually save it for later it the year. They turned out amazing last year.

    Reply

Leave a Reply Cancel reply

Your email address will not be published. Required fields are marked *

This site uses Akismet to reduce spam. Learn how your comment data is processed.

Follow Me

  • Instagram
  • Pinterest
  • RSS
  • Twitter

Never Miss a Post - Follow by Email

Find a ** FREE ** Lesson (Below):

  • Lessons Inspired by Famous Artists
    • Britto, Romero
    • Burch, Laurel
    • Calder, Alexander
    • Carle, Eric
    • Cezanne, Paul
    • Chagall, Marc
    • Chihuly, Dale
    • Dali, Salvadore
    • Da Vinci, Leonardo
    • Delaunay, Robert & Sonia
    • Escher, M.C.
    • Goldsworthy, Andy
    • Haring, Keith
    • Johns, Jasper
    • Kahlo, Frida
    • Kandinsky, Wassily
    • Klee, Paul
    • Klimt, Gustave
    • Matisse, Henri
    • Miro, Joan
    • Mondrian, Piet
    • Monet, Claude
    • O’Keeffe, Georgia
    • Old Masters
    • Picasso, Pablo
    • Pollock, Jackson
    • Pompon, Francois
    • Posada, Jose
    • Remington, Frederick
    • Renoir, Auguste
    • Seurat, Georges
    • Seuss, Dr.
    • Van Gogh, Vincent
    • Van Honthorst, Gerard
    • Wood, Grant
  • Lessons by Holiday
    • 100th Day of School
    • Chinese New Year
    • Christmas
    • Day of the Dead / Dia de los Muertos
    • Earth Day
    • Easter
    • Father’s Day
    • Halloween
    • International Dot Day
    • Memorial Day
    • Mother’s Day
    • New Years
    • Other
    • Thanksgiving
    • Valentine’s Day
  • Lessons by Culture
    • Africa
    • America
    • Chile
    • China
    • Europe
    • Haiti
    • Japan
    • Mexico
    • Middle East
  • Lessons by Process
    • 3D / Sculpture
    • Bookmaking
    • Calligraphy
    • Collage
    • Drawing
    • Embossing
    • Folding
    • Lettering
    • Micrography
    • Mosaic
    • Origami
    • Painting
    • Paper Cutting
    • Paper Folding
    • Printmaking
    • Quilling
    • Recycling with Art
    • Sketching
    • Stitching / Embroidery
    • Weaving
  • Lessons by Medium
    • Acrylic
    • Clay
    • Colored Pencil
    • Crayon
    • Digital / Computer
    • Fabric / Fiber
    • Markers / Pen and Ink
    • Mixed Media
    • Oil Pastel
    • Paper
    • Pencil
    • Tempera
    • Watercolor
  • Lessons by Style
    • Abstract (Non-representational)
    • Abstract (Representational)
    • Cartoon
    • Cubism
    • Expressionism
    • Fantasy
    • Impressionism
    • Op Art
    • Orphism
    • Pointillism
    • Pop Art
    • Post Impressionism
    • Realism
    • Surrealism
  • Lessons by Subject
    • Abstract Design
    • Animals
    • Birds
    • Buildings
    • Butterflies
    • Cityscape
    • Color / Color Mixing
    • Creatures / Monsters
    • Cross
    • Faith
    • Elements of Art
    • Fish / Marine Life
    • Flowers
    • Greeting Cards
    • Hearts
    • Imagination
    • Landscape
    • Mandalas
    • Masks
    • Math with Art
    • Misc. Subjects
    • Names
    • Nature
    • Ocean / Seascapes
    • People
    • Portraits / Self-Portraits
    • Religion
    • Quilts
    • Scripture
    • Seasons
    • Sky
    • snow
    • Stars
    • Still Life
    • Trees
    • Words / Letters
  • … and More!
    • Bulletin Boards & Displays
    • Classroom Management
    • Elements of Art
    • Imagination
    • Inspiration
    • Middle School Art
    • News & Announcements
    • Philosophy
    • Portfolios
    • Product Reviews
    • Quotes & Stories
    • Supplies / Products
    • Teacher Workshops
    • Tips for Teaching Art

Follow me on
Teachers Pay Teachers

Support Teach Kids Art When you shop Amazon.com

TEACH KIDS ART IS AN AMAZON AFFILIATE. I earn a small commission when you visit Amazon.com by clicking through my site and make a purchase of any kind. This supports Teach Kids Art at no extra cost to you.

Click here to shop Amazon.com!

Related Posts

  • TIP #65: 12 Positive Affirmations for Creative Kids
  • Review the Elements of Art with a Beachball Scavenger Hunt
  • Make a Crazy Crown Craft
  • Use Art Postcards to Teach or Review
  • How to Have an Elements of Art Scavenger Hunt in a Painting

Copyright © 2023 Cheryl Trowbridge / Teach Kids Art · All Rights Reserved · Privacy Policy · Design by Laugh Eat Learn


We use cookies on our website to give you the most relevant experience by remembering your preferences and repeat visits. By clicking “Accept”, you consent to the use of ALL the cookies.
Cookie settingsACCEPT
Privacy & Cookies Policy

Privacy Overview

This website uses cookies to improve your experience while you navigate through the website. Out of these, the cookies that are categorized as necessary are stored on your browser as they are essential for the working of basic functionalities of the website. We also use third-party cookies that help us analyze and understand how you use this website. These cookies will be stored in your browser only with your consent. You also have the option to opt-out of these cookies. But opting out of some of these cookies may affect your browsing experience.
Necessary
Always Enabled
Necessary cookies are absolutely essential for the website to function properly. This category only includes cookies that ensures basic functionalities and security features of the website. These cookies do not store any personal information.
Non-necessary
Any cookies that may not be particularly necessary for the website to function and is used specifically to collect user personal data via analytics, ads, other embedded contents are termed as non-necessary cookies. It is mandatory to procure user consent prior to running these cookies on your website.
SAVE & ACCEPT