Abstract (Representational) | Drawing | Lessons | Markers / Pen and Ink | Mexico | Multicultural | Nature | Painting | Tempera
“Faux” Mexican Bark “Paintings”
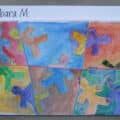
 These Mexican Bark “Paintings” by my 5th graders got more “wows” than any other project at our recent school art show. By using markers instead of paint, we saved time in both prep and clean-up, as well as the extra step of touching up with black Sharpie after painting. And the marker on the brown paper produced some beautiful colors! Using markers in place of paint was an experiment I tried because we were a little short on time, but these “paintings” turned out even better than I expected…. I will definitely use this technique again!
Materials:
- Brown paper grocery bags, cut apart to approx. 12×14
- Pencil and eraser
- Black “F” Sharpie
- Crayola Water-based markers
- White tempera paint
- Fine point paint brush, about a size “2”
Directions:
1. Use pencil to draw some fanciful birds, flowers, or animals on your paper. Add a decorative border along one edge, if you want.
2. Then, trace over your pencil lines with Sharpie.
3. Next, crinkle your paper, smooth it out, and repeat until you have an even, “crumpled” texture. (Flatten your paper by placing under heavy books overnight or press with a dry iron.)
4. Now, color your design with markers. Make sure you leave some of the brown paper background showing!
5. Finally, add small dots of white paint with a fine point brush around some areas of your design to make them “pop”.


These are really great!
One question: do you crumple the paper before drawing or after it?
Lovely! I like the idea of adding the white dots. The fifth graders have some very charming work.
Jacquelien – We always crumple the paper AFTER tracing our drawings with Sharpie. If you crumple it first, it's harder to draw on and if you don't trace your lines with Sharpie before you crumple it, the pencil seems to wear off and almost disappear when you crumple the paper. You could probably crumple it after coloring with markers, but before painting the dots, although I haven't tried it that way.
I just love the childrens mexican bark paintings. Another technique I have just used to do the same project is to cover the brown paper with wax by rubbing white candles( clear) onto the paper. Crush up the paper, open up and flatten by hand, and then brush on the cracked waxed side dye with water based edicol or food colour( I mixed up a brown from green and orange)it resists most of the dye. PLace upside down on newspaper and iron to dry and reflatten and remove some of the wax. The paper can then be drawn on or painted on. I have just finished make amate picados ( search on the internet. I made a basic stencil which the students then developed.
I did this project a couple years ago with 5th grade also. Since we are in Arizona, I changed it to plants and animals of Arizona. We used fluorescent paints and outlined with sharpies. I also made a faux bark paper by having the students crumple it, flatten it, and then dip in into a water bath that had some watered down brown and black tempera paint added. We then had to flatten it overnight. I'm impressed at how well they look with markers! Great job!
Great!!!!
Sometimes I wish I was still a kid.
They make such a beautifull art.
Love from Holland,
Simone
Charlene flatten with a moderate temp iron. I was given an old one. It can be done so quickly and the kids can start painting or drawing again straight away. I do the ironing and guess with a class of 25 kids it takes me about 10 mins to get through everyone.It does not remove all the cracks or crinkles
Oops forgot to say the use a pile of old newspaper to iron on to absorb the wet colour, and change every 5 piece approx. Cheryl
Thanks for the great advice Cheryl!
these are beautiful
Wonderful blog! You should make a CD and sell it to art teachers!
Meanwhile, is there a way to get the Faux Bark project printed? It is awesome!
I just found your blog and subscribed to your newsletter. Thanks so much!
MJ
Thanks, Mary Jane! Right now, my lessons are just on my blog, but someday I hope to have more options available….. Stay tuned!
This comment has been removed by a blog administrator.