TeachKidsArt

a resource for teachers & families

  • Home
  • Blog
  • Artist Birthdays
  • SHOP TPT
  • About
  • Contact
  • TIP Vault

Monoprint Mandalas

By Cheryl Trowbridge 8 Comments

Share
Pin
Tweet
Print
Monoprint Dots
Monoprint Dots… Bet you can’t make just one!

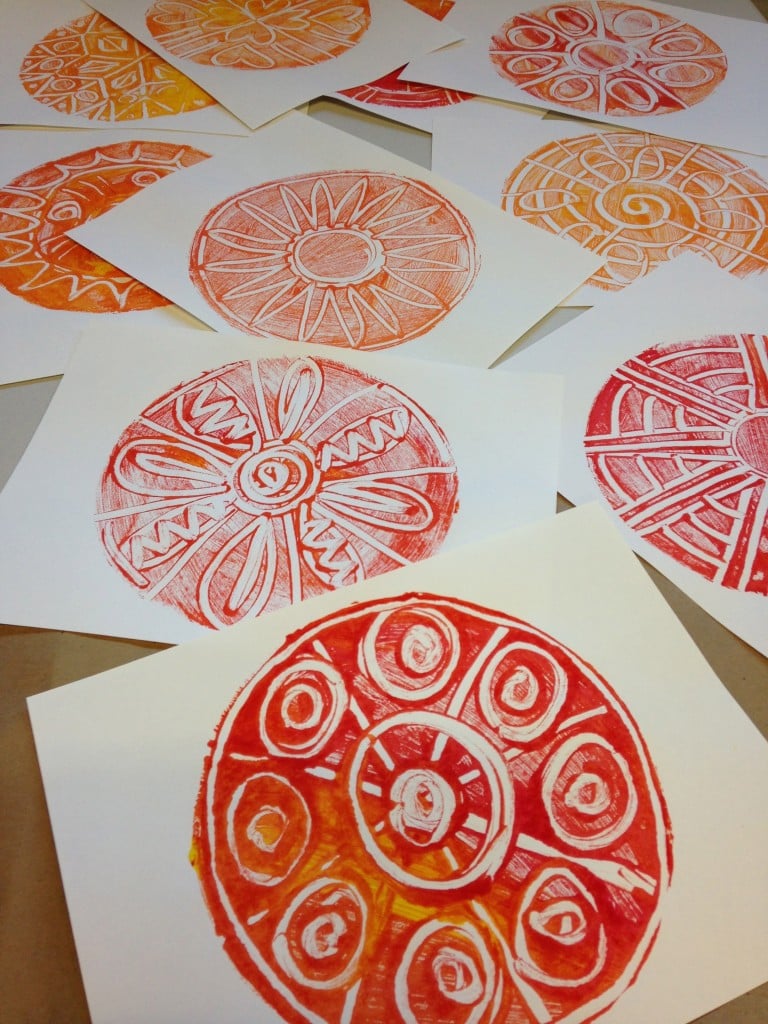
International Dot Day, and one of my all-time favorite books, “The Dot” by Peter Reynolds, were my inspiration for this lesson! I wanted to come up with a new way to make a series of quick, colorful, one-of-a-kind “dots” that could be completed in one class session. With mono­prints, only one print can be made from each design, but you can repaint the print­ing sur­face and make as many new designs as you like! These designs are styled after mandalas, cir­cu­lar designs with radial sym­me­try and repeat­ing pat­terns.

You’ll Need:

  • foam core board (a great way to use up odd sizes of left-overs) OR use cardboard cake board rounds to save time
  • circle template (I used a bowl to trace my circle)
  • pencil or pen for tracing
  • Xacto knife for cutting foam core board (an adult should do this)
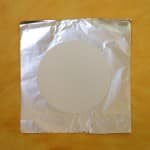
  • aluminum foil (a little larger than your circle)
  • masking tape
  • tempera paint: red, yellow and blue (use any 2 of the 3 primary colors at one time, unless you want brown!)
  • 1″ foam brush
  • Q-tip
  • 9×12 white paper to print on
  • wet wipes for clean up

Directions:

1. Trace and cut your circle, making it a little smaller than the paper you want to print on. (Or skip this step by using the cardboard cake board rounds mentioned above!) 

2. Wrap your foam circle with aluminum foil, so that one side is completely covered. Wrap the sides of the foil over the edges and tape to the back.

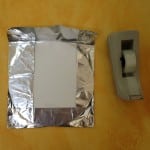
3. Make a “handle” from tape on the back of your foam circle, so you’ll have something to hang onto while you’re painting/printing.

4. Squirt two different colors of tempera paint (about the size of a quarter each) onto the smooth foil surface. (If you use too much paint, your design will fill back in. You may need to experiment to find the optimum amount!)

5. Holding your circle by the tape handle on the back, use a foam brush to spread the paint in a thin layer over the entire surface. Let the two colors mix a little, but not completely. This will give you some variation of color and a more interesting design. (Any two of the three primary colors will create a secondary color when mixed together.)

6. Use a Q-tip to draw a simple design with radial symmetry. Start with large divisions of space and keep adding details equally to each area until your design looks complete. You’ll need to work quickly (before your paint dries), but that’s half the fun!

7. Press your foam circle onto the 9×12 paper. Turn the whole thing over and carefully rub the paper with your hands to transfer your design onto the paper.

8. Peel off the paper and set your print aside to dry.

9. Apply more paint, draw a new design, and make more prints!

Trace a circle onto foam board
Trace a circle onto foam board.
Cut out circle with Xacto knife
Cut out foam circle with Xacto knife.
Cover one side with foil
Cover one side with foil.
Fold foil over edges of circle and tape to back
Fold foil over edges of foam circle and tape to back.
Make a handle with tape
Make a handle with tape.
Hold your circle by the tape handle
Hold your foam circle by the tape handle.
Spread a thin layer of paint onto circle
Spread a thin layer of paint onto foam circle.
Draw design with Q-tip
Draw design with Q-tip.
Keep it symmetrical!
Press foam circle onto paper
Press foam circle onto paper.
Peel off the paper
Peel off the paper.
Your print is finished!
Use a wet wipe to clean off paint
Use a wet wipe to clean paint from surface when switching colors.
Make more prints!
Make more prints!
Monoprint "Dot"
Monoprint “Dot”
Monoprint "Dot"
Monoprint “Dot”
Monoprint "Dot"
Monoprint “Dot”
Monoprint "Dot"
Monoprint “Dot”
Monoprint "Dot"
Monoprint “Dot”
Monoprint "Dot"
Monoprint “Dot”
Monoprint "Dot"
Monoprint “Dot”
Share
Pin
Tweet
Print

You may also like...

Default ThumbnailRorschach Creatures Default ThumbnailGrade 3 Portfolios – The Shapes and Colors of Joy Default ThumbnailHand Print Art for Pre-K and Kindergarten Default ThumbnailGrade 1 Portfolios – Design a Dot!

Filed Under: Abstract (Non-representational), Books, International Dot Day, Lessons, Mandalas, Printmaking, Tempera Tagged With: Dot Day, mandala, monoprint

Comments

  1. Emily says

    at

    this is a great monoprint technique! i’ll definitely try it out with my students this year- it would be a great link-in with Cy Twombly, too!

    Reply
    • Cheryl Trowbridge says

      at

      I didn’t know about Cy Twombly, Emily, so thanks for telling me! Glad you’ll be trying this lesson…. let me know how it goes!

      Reply
  2. Rina says

    at

    Hi Cheryl
    What an original project for Dot Day. Thanks for taking the time to photograph and post the entire step-by-step.

    Reply
    • Cheryl Trowbridge says

      at

      You’re welcome, Rina! I hope you’ll try it… monoprints are so much fun!! :-)

      Reply
  3. Laura says

    at

    What kind of paint did you use for this? I love the idea and I am trying it before doing it with a class, but I used premium tempera and none of the designs came out clearly. They are all splotchy! Any advice?

    Reply
    • Cheryl Trowbridge says

      at

      I always use the Sargent brand liquid tempera, and get great results every time. A little streakiness is to be expected (as you can see in the pics) but that’s also part of the charm! If you’re having a lot of trouble with the paint beading up on the foil, you can always add a drop of dish soap to the paint to help it stick. Hope that helps!

      Reply
  4. Mr. P says

    at

    Thanks for this!!! I was thinking of using plexiglass for a monoprint lesson this year, but this is all stuff I already have on hand!!!

    I’ll definitely be adding this to my youtube channel!!!

    Thanks again,
    Mr. P

    Reply
    • Cheryl Trowbridge says

      at

      That’s great, Mr. P! I’m glad my idea was helpful to you!!

      Reply

Leave a Reply Cancel reply

Your email address will not be published. Required fields are marked *

This site uses Akismet to reduce spam. Learn how your comment data is processed.

Follow Me

  • Instagram
  • Pinterest
  • RSS
  • Twitter

Never Miss a Post - Follow by Email

Find a ** FREE ** Lesson (Below):

  • Lessons Inspired by Famous Artists
    • Britto, Romero
    • Burch, Laurel
    • Calder, Alexander
    • Carle, Eric
    • Cezanne, Paul
    • Chagall, Marc
    • Chihuly, Dale
    • Dali, Salvadore
    • Da Vinci, Leonardo
    • Delaunay, Robert & Sonia
    • Escher, M.C.
    • Goldsworthy, Andy
    • Haring, Keith
    • Johns, Jasper
    • Kahlo, Frida
    • Kandinsky, Wassily
    • Klee, Paul
    • Klimt, Gustave
    • Matisse, Henri
    • Miro, Joan
    • Mondrian, Piet
    • Monet, Claude
    • O’Keeffe, Georgia
    • Old Masters
    • Picasso, Pablo
    • Pollock, Jackson
    • Pompon, Francois
    • Posada, Jose
    • Remington, Frederick
    • Renoir, Auguste
    • Seurat, Georges
    • Seuss, Dr.
    • Van Gogh, Vincent
    • Van Honthorst, Gerard
    • Wood, Grant
  • Lessons by Holiday
    • 100th Day of School
    • Chinese New Year
    • Christmas
    • Day of the Dead / Dia de los Muertos
    • Earth Day
    • Easter
    • Father’s Day
    • Halloween
    • International Dot Day
    • Memorial Day
    • Mother’s Day
    • New Years
    • Other
    • Thanksgiving
    • Valentine’s Day
  • Lessons by Culture
    • Africa
    • America
    • Chile
    • China
    • Europe
    • Haiti
    • Japan
    • Mexico
    • Middle East
  • Lessons by Process
    • 3D / Sculpture
    • Bookmaking
    • Calligraphy
    • Collage
    • Drawing
    • Embossing
    • Folding
    • Lettering
    • Micrography
    • Mosaic
    • Origami
    • Painting
    • Paper Cutting
    • Paper Folding
    • Printmaking
    • Quilling
    • Recycling with Art
    • Sketching
    • Stitching / Embroidery
    • Weaving
  • Lessons by Medium
    • Acrylic
    • Clay
    • Colored Pencil
    • Crayon
    • Digital / Computer
    • Fabric / Fiber
    • Markers / Pen and Ink
    • Mixed Media
    • Oil Pastel
    • Paper
    • Pencil
    • Tempera
    • Watercolor
  • Lessons by Style
    • Abstract (Non-representational)
    • Abstract (Representational)
    • Cartoon
    • Cubism
    • Expressionism
    • Fantasy
    • Impressionism
    • Op Art
    • Orphism
    • Pointillism
    • Pop Art
    • Post Impressionism
    • Realism
    • Surrealism
  • Lessons by Subject
    • Abstract Design
    • Animals
    • Birds
    • Buildings
    • Butterflies
    • Cityscape
    • Color / Color Mixing
    • Creatures / Monsters
    • Cross
    • Faith
    • Elements of Art
    • Fish / Marine Life
    • Flowers
    • Greeting Cards
    • Hearts
    • Imagination
    • Landscape
    • Mandalas
    • Masks
    • Math with Art
    • Misc. Subjects
    • Names
    • Nature
    • Ocean / Seascapes
    • People
    • Portraits / Self-Portraits
    • Religion
    • Quilts
    • Scripture
    • Seasons
    • Sky
    • snow
    • Stars
    • Still Life
    • Trees
    • Words / Letters
  • … and More!
    • Bulletin Boards & Displays
    • Classroom Management
    • Elements of Art
    • Imagination
    • Inspiration
    • Middle School Art
    • News & Announcements
    • Philosophy
    • Portfolios
    • Product Reviews
    • Quotes & Stories
    • Supplies / Products
    • Teacher Workshops
    • Tips for Teaching Art

Follow me on
Teachers Pay Teachers

Support Teach Kids Art When you shop Amazon.com

TEACH KIDS ART IS AN AMAZON AFFILIATE. I earn a small commission when you visit Amazon.com by clicking through my site and make a purchase of any kind. This supports Teach Kids Art at no extra cost to you.

Click here to shop Amazon.com!

Related Posts

  • A Creative Color Game for All Ages
  • An Engaging Art Museum Activity for Kids
  • TIP #66: 10 Ways to Save Money on Art Supplies for Kids
  • Better Paint Brush Habits for Kids
  • Review the Elements of Art with a Beachball Scavenger Hunt

Copyright © 2023 Cheryl Trowbridge / Teach Kids Art · All Rights Reserved · Privacy Policy · Design by Laugh Eat Learn


We use cookies on our website to give you the most relevant experience by remembering your preferences and repeat visits. By clicking “Accept”, you consent to the use of ALL the cookies.
Cookie settingsACCEPT
Privacy & Cookies Policy

Privacy Overview

This website uses cookies to improve your experience while you navigate through the website. Out of these, the cookies that are categorized as necessary are stored on your browser as they are essential for the working of basic functionalities of the website. We also use third-party cookies that help us analyze and understand how you use this website. These cookies will be stored in your browser only with your consent. You also have the option to opt-out of these cookies. But opting out of some of these cookies may affect your browsing experience.
Necessary
Always Enabled
Necessary cookies are absolutely essential for the website to function properly. This category only includes cookies that ensures basic functionalities and security features of the website. These cookies do not store any personal information.
Non-necessary
Any cookies that may not be particularly necessary for the website to function and is used specifically to collect user personal data via analytics, ads, other embedded contents are termed as non-necessary cookies. It is mandatory to procure user consent prior to running these cookies on your website.
SAVE & ACCEPT