TeachKidsArt

a resource for teachers & families

  • Home
  • Blog
  • Artist Birthdays
  • SHOP TPT
  • About
  • Contact
  • TIP Vault

Popcorn Drawing – Observation & Imagination

By Cheryl Trowbridge 4 Comments

Share
Pin
Tweet
Print
Have you ever looked at a cloud and seen an animal or some other random image?  Most everyone has used their imagination to “find” things in clouds, and popcorn offers this same creative experience!  This is a great lesson for 5th grade and up.  Make sure you create a sample to illustrate the steps… a picture is worth a thousand words here!  After doing this lesson, your students (and you!) will never look at a piece of popcorn (or a bear sitting on a rock, wearing a red bandana!) the same way again!
 
Materials:
  • 9×12 black construction paper
  • popcorn (at least 2 pieces per student)
  • white craft glue (Aleene’s Tacky Glue is my favorite)
  • white charcoal pencil or white Prismacolor drawing pencil
  • Magic Rub eraser
  • 9×12 tracing paper
  • No.2 graphite pencil
  • fine point marker, any color except black (I like to use a colored “F” Sharpie or a Crayola water base marker.)
  • 9×12 white construction paper
  • Color pencils
Directions:
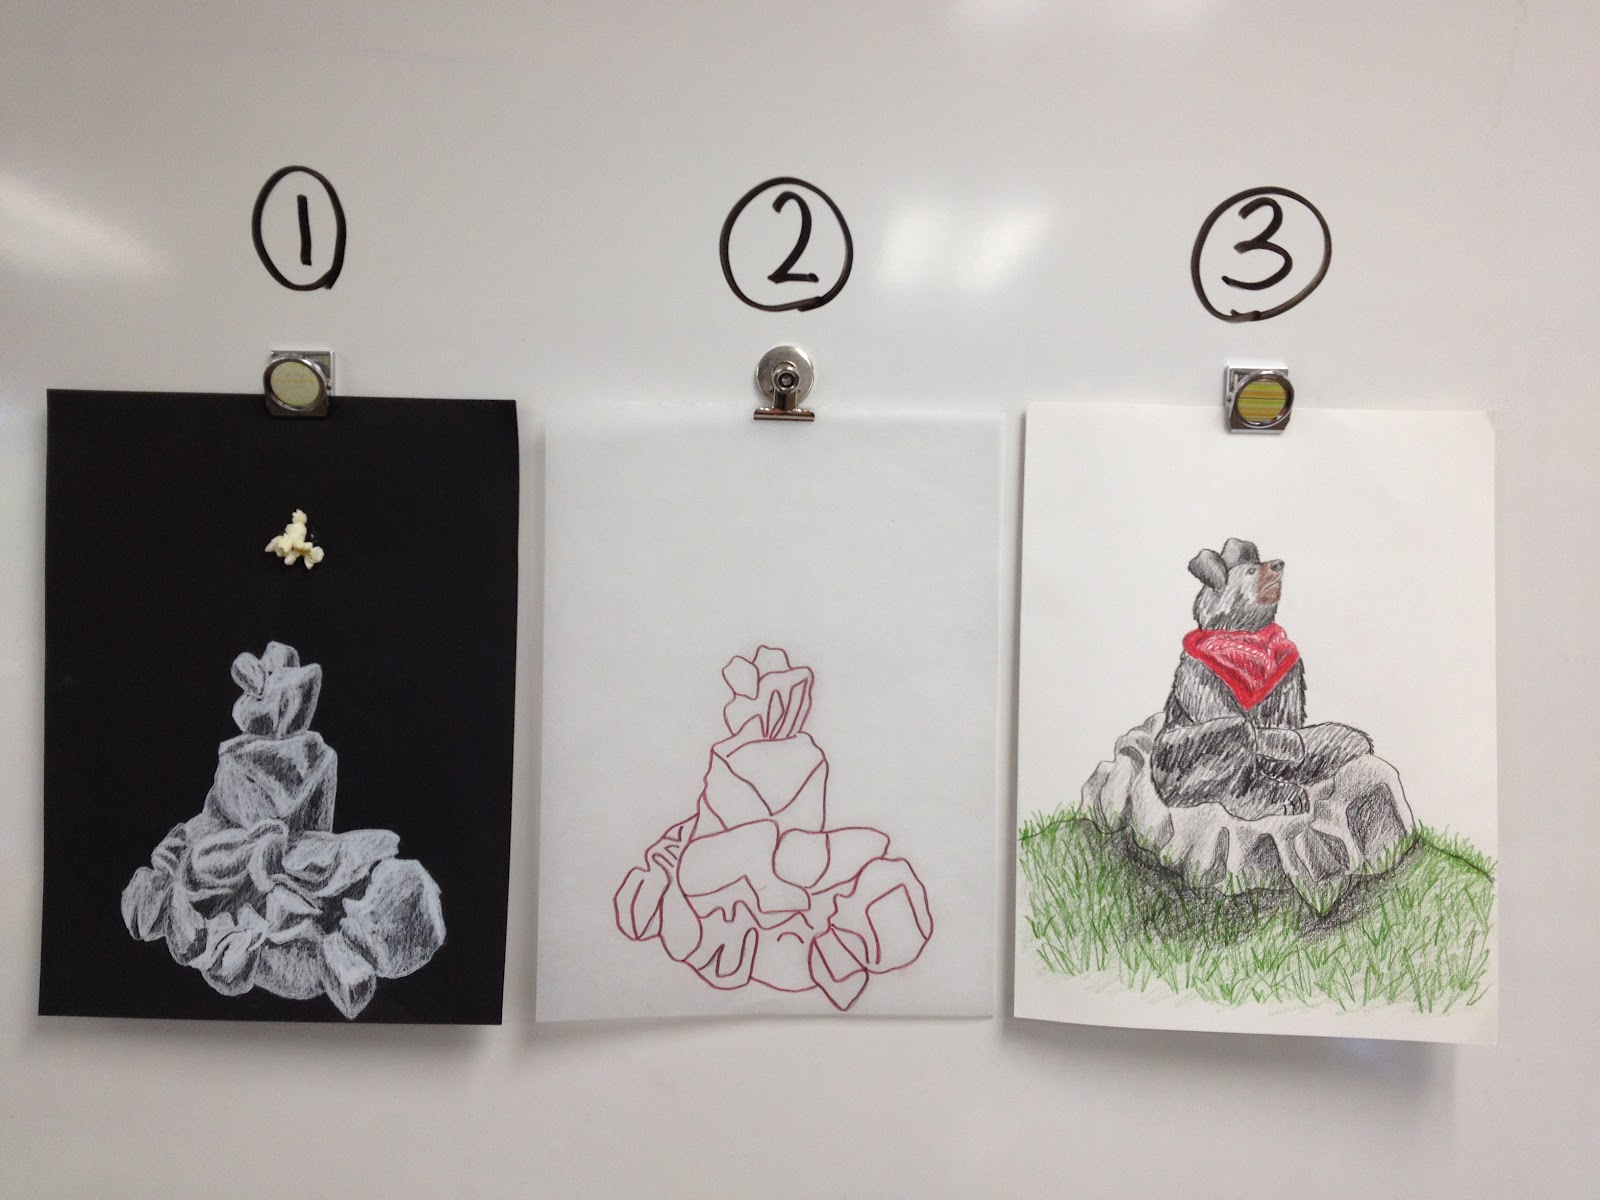
1. Pass out 2 (or more) pieces of popcorn to each student.  Let them choose one to draw and one (or more) to eat!
 
2. Squirt a dime size blob of glue near the top of your 9×12 black paper. (I went around and did this as students were “examining” their popcorn for the most interesting side to draw!)  Place popcorn on the glue.
 
3. Use a white pencil to draw the popcorn (as large as possible) below the popcorn you glued to the paper.  Press harder on the lightest areas and less hard in the shadowed areas. (It can be helpful to make a value scale using a white pencil on black paper to practice making a range of values. Explain to students that this is the opposite of working with a graphite pencil, where pressing harder produces a darker value. You may also need to review contour drawing principles if you haven’t done any observation drawing in a while.) 
 
4. Then, lay tracing paper on top of your white on black drawing.  Use a colored marker to trace the outside shape (contour) and any important lines on the inside.
 
5. Next, turn your tracing paper over to the back.  You’ll be able to see your colored marker lines through it.  Trace over the top of these lines with a regular No.2 graphite pencil.  Press hard so your lines will be nice and dark.
 
6. Now, lay your tracing paper, pencil side down, on top of your white paper.  Trace over your marker lines using your No.2 pencil.  If you used a colored marker for step #4, it will be easy to see where you’ve traced and where you still need to!
 
7. Lift off the tracing paper and you’ll see a faint copy of your drawing on the white paper.  Turn your paper different directions and use your imagination to find an interesting image in your popcorn, if you haven’t already!
 
8. Finally, use colored pencils to finish your drawing, adding any details you need so your viewer can see what you saw in your popcorn!
 
What types of objects have you used to do observation-imagination drawings?
 
 
Share
Pin
Tweet
Print

You may also like...

Default ThumbnailHaiku Tunnel Books Default Thumbnail“Thank You” Drawings Default ThumbnailLine Designs with Shading Default ThumbnailGung Hey Fat Choy!

Filed Under: Colored Pencil, Drawing, Imagination, Lessons, Process, Subject Tagged With: colored pencil, contour drawing, observation drawing, popcorn, value scale

Comments

  1. Hope Hunter Knight says

    at

    I've done a popcorn drawing lesson where I put a small plate of popcorn in the middle of each work table and each student chooses one popped kernel to draw. After drawing the kernel several times from various views, we toss our “popcorn friends” back in the plate and I come around and mix the kernels back up. Then we see who can find their “friend”, and everyone always does! It's amazing how well you get to know something once you've see it through drawing.

    Reply
    • Nancy Scoble, Washington, NC says

      at

      I believe it.

      Reply
  2. Art Project Girl says

    at

    Hope that sounds so cool. Do you have it posted on your blog?

    Reply
  3. TeachKidsArt says

    at

    Great idea, Hope! I do that when I teach observational drawing to my 3rd graders, only we use peanuts in the shell. They're always amazed at how they know right away which one is theirs…. super fun!!

    Reply

Leave a Reply Cancel reply

Your email address will not be published. Required fields are marked *

This site uses Akismet to reduce spam. Learn how your comment data is processed.

Follow Me

  • Instagram
  • Pinterest
  • RSS
  • Twitter

Never Miss a Post - Follow by Email

Find a ** FREE ** Lesson (Below):

  • Lessons Inspired by Famous Artists
    • Britto, Romero
    • Burch, Laurel
    • Calder, Alexander
    • Carle, Eric
    • Cezanne, Paul
    • Chagall, Marc
    • Chihuly, Dale
    • Dali, Salvadore
    • Da Vinci, Leonardo
    • Delaunay, Robert & Sonia
    • Escher, M.C.
    • Goldsworthy, Andy
    • Haring, Keith
    • Johns, Jasper
    • Kahlo, Frida
    • Kandinsky, Wassily
    • Klee, Paul
    • Klimt, Gustave
    • Matisse, Henri
    • Miro, Joan
    • Mondrian, Piet
    • Monet, Claude
    • O’Keeffe, Georgia
    • Old Masters
    • Picasso, Pablo
    • Pollock, Jackson
    • Pompon, Francois
    • Posada, Jose
    • Remington, Frederick
    • Renoir, Auguste
    • Seurat, Georges
    • Seuss, Dr.
    • Van Gogh, Vincent
    • Van Honthorst, Gerard
    • Wood, Grant
  • Lessons by Holiday
    • 100th Day of School
    • Chinese New Year
    • Christmas
    • Day of the Dead / Dia de los Muertos
    • Earth Day
    • Easter
    • Father’s Day
    • Halloween
    • International Dot Day
    • Memorial Day
    • Mother’s Day
    • New Years
    • Other
    • Thanksgiving
    • Valentine’s Day
  • Lessons by Culture
    • Africa
    • America
    • Chile
    • China
    • Europe
    • Haiti
    • Japan
    • Mexico
    • Middle East
  • Lessons by Process
    • 3D / Sculpture
    • Bookmaking
    • Calligraphy
    • Collage
    • Drawing
    • Embossing
    • Folding
    • Lettering
    • Micrography
    • Mosaic
    • Origami
    • Painting
    • Paper Cutting
    • Paper Folding
    • Printmaking
    • Quilling
    • Recycling with Art
    • Sketching
    • Stitching / Embroidery
    • Weaving
  • Lessons by Medium
    • Acrylic
    • Clay
    • Colored Pencil
    • Crayon
    • Digital / Computer
    • Fabric / Fiber
    • Markers / Pen and Ink
    • Mixed Media
    • Oil Pastel
    • Paper
    • Pencil
    • Tempera
    • Watercolor
  • Lessons by Style
    • Abstract (Non-representational)
    • Abstract (Representational)
    • Cartoon
    • Cubism
    • Expressionism
    • Fantasy
    • Impressionism
    • Op Art
    • Orphism
    • Pointillism
    • Pop Art
    • Post Impressionism
    • Realism
    • Surrealism
  • Lessons by Subject
    • Abstract Design
    • Animals
    • Birds
    • Buildings
    • Butterflies
    • Cityscape
    • Color / Color Mixing
    • Creatures / Monsters
    • Cross
    • Faith
    • Elements of Art
    • Fish / Marine Life
    • Flowers
    • Greeting Cards
    • Hearts
    • Imagination
    • Landscape
    • Mandalas
    • Masks
    • Math with Art
    • Misc. Subjects
    • Names
    • Nature
    • Ocean / Seascapes
    • People
    • Portraits / Self-Portraits
    • Religion
    • Quilts
    • Scripture
    • Seasons
    • Sky
    • snow
    • Stars
    • Still Life
    • Trees
    • Words / Letters
  • … and More!
    • Bulletin Boards & Displays
    • Classroom Management
    • Elements of Art
    • Imagination
    • Inspiration
    • Middle School Art
    • News & Announcements
    • Philosophy
    • Portfolios
    • Product Reviews
    • Quotes & Stories
    • Supplies / Products
    • Teacher Workshops
    • Tips for Teaching Art

Follow me on
Teachers Pay Teachers

Support Teach Kids Art When you shop Amazon.com

TEACH KIDS ART IS AN AMAZON AFFILIATE. I earn a small commission when you visit Amazon.com by clicking through my site and make a purchase of any kind. This supports Teach Kids Art at no extra cost to you.

Click here to shop Amazon.com!

Related Posts

  • TIP #65: 12 Positive Affirmations for Creative Kids
  • Review the Elements of Art with a Beachball Scavenger Hunt
  • Make a Crazy Crown Craft
  • Use Art Postcards to Teach or Review
  • How to Have an Elements of Art Scavenger Hunt in a Painting

Copyright © 2023 Cheryl Trowbridge / Teach Kids Art · All Rights Reserved · Privacy Policy · Design by Laugh Eat Learn


We use cookies on our website to give you the most relevant experience by remembering your preferences and repeat visits. By clicking “Accept”, you consent to the use of ALL the cookies.
Cookie settingsACCEPT
Privacy & Cookies Policy

Privacy Overview

This website uses cookies to improve your experience while you navigate through the website. Out of these, the cookies that are categorized as necessary are stored on your browser as they are essential for the working of basic functionalities of the website. We also use third-party cookies that help us analyze and understand how you use this website. These cookies will be stored in your browser only with your consent. You also have the option to opt-out of these cookies. But opting out of some of these cookies may affect your browsing experience.
Necessary
Always Enabled
Necessary cookies are absolutely essential for the website to function properly. This category only includes cookies that ensures basic functionalities and security features of the website. These cookies do not store any personal information.
Non-necessary
Any cookies that may not be particularly necessary for the website to function and is used specifically to collect user personal data via analytics, ads, other embedded contents are termed as non-necessary cookies. It is mandatory to procure user consent prior to running these cookies on your website.
SAVE & ACCEPT