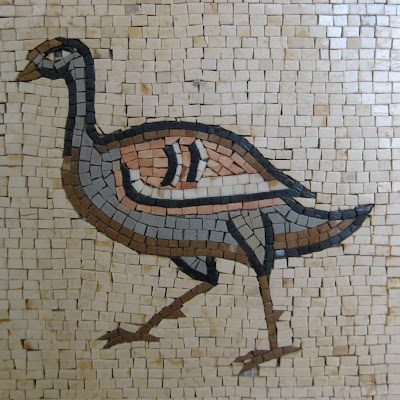
TeachKidsArt

a resource for teachers & families

  • Home
  • Blog
  • Artist Birthdays
  • SHOP TPT
  • About
  • Contact
  • TIP Vault

Mosaics

By Cheryl Trowbridge 7 Comments

Share
Pin
Tweet
Print
Mosaic projects can be adapted for all ages. Just follow these directions and use larger tiles and a smaller backing board if working with young children…. or anyone with a shorter attention span!
Historical examples of mosaic art have been found in Roman ruins throughout Europe and around the Mediterranean. Traditional mosaics were made from tiny squares of natural-colored rock called “tesserae”. These intricate designs featured scenes from everyday life, such as people, plants and animals.


Creating a detailed paper mosaic can be tedious work, so I made a few adjustments in hopes of avoiding this! First, I chose card stock (way easier to work with than paper!) and cut it into strips, then students simply cut the strips into squares. Then, I simplified the application process by spraying the backing board with Spraymount artist’s adhesive, eliminating the need for applying glue to each individual piece…. a huge time saver!

Materials:

  • 1/2″ strips of card stock in a variety of colors (I used old recycled file folders in as many colors as I could come up with. For the colors I needed and couldn’t find, I used the plain manila color and just colored the strips with markers…. quick and easy!)
  • Black construction paper, 9×12 or smaller
  • 3M Spraymount artist’s adhesive
  • Paper trimmer and scissors
  • Pencil
  • Clear varnish spray or Mod Podge to seal your finished work

Directions:
1. Draw a simple design with pencil on black paper…. avoid details! (By using black paper for your backing, your pencil lines won’t show later.)
2. Spray a light coat of 3M Spraymount artist’s adhesive over your paper. (Make sure you do this outside and over newspaper, to protect the area around your paper from the over spray.)
3. Use a paper trimmer to cut 1/2 inch strips of the colors you’ll need, then use scissors to cut the strips into squares.
4. Place your squares onto your design, leaving just a tiny margin of black paper showing in between. Try not to overlap squares, but trim them as necessary to fit where they need to. (It can be helpful to lightly pencil in where you want to trim.) Since Spraymount adhesive is repositionable, you can pick up squares and move them at any time or even switch colors if you want to.
5. When your design is complete, cover it with a clear varnish to hold the squares firmly in place.

Share
Pin
Tweet
Print

You may also like...

Default ThumbnailMiddle Eastern Inspiration Default Thumbnail“3D” Flower Collage Default ThumbnailGung Hey Fat Choy! Default ThumbnailPositive/Negative Space Collage #1

Filed Under: Collage, Lessons, Middle East, Mosaic, Multicultural, Paper Tagged With: Europe, Middle East, mosaics, multicultural art, paper

Comments

  1. Kathy says

    at

    This would be a fun lesson to try with the 6th grade group I'll have next year! I might be able to coordinate something with the social studies unit and Roman times.

    Reply
  2. Catherine says

    at

    I LOVE this idea! I'm thinking about how I can adapt it for preschoolers.

    I really enjoy your blog!

    Reply
  3. Melissa says

    at

    I am sooo looking forward to learning from you – thanks for sharing!

    Reply
  4. theeclecticlife says

    at

    Incredible project! How many classes did it take for them to complete this project? Also, since you sprayed their projects with spray adhesive, how did you house the projects since it sounds like they would normally stick together if you put all the papers in a stack. I'm a 2nd year art teacher so there's SO much I need to learn!

    Reply
  5. TeachKidsArt says

    at

    I did this project at an art camp this summer. We completed it in one morning, which was about two hours of actual working time, at the most. I will probably divide this project up into three 50 minute sessions when I do it at school… one to explain, demo and have them draw designs, the second to begin placing the tiles and the third to finish the tiles and paint with Mod Podge. You could spray them after they draw their designs at the end of the first session. If you just loosely stack them, they won't stick together. Remember to use repositionable spray adhesive – that's important!

    Reply
  6. Annet says

    at

    Incredible! I am a kindergarten supervisor and have been looking for such amazing artwork for my kids. How can I be helped to teach my learners a variety? How can I access you?
    I surely luv it.

    Reply
  7. rachel smith says

    at

    what a pretty apple!

    Reply

Leave a Reply Cancel reply

Your email address will not be published. Required fields are marked *

This site uses Akismet to reduce spam. Learn how your comment data is processed.

Follow Me

  • Instagram
  • Pinterest
  • RSS
  • Twitter

Never Miss a Post - Follow by Email

Find a ** FREE ** Lesson (Below):

  • Lessons Inspired by Famous Artists
    • Britto, Romero
    • Burch, Laurel
    • Calder, Alexander
    • Carle, Eric
    • Cezanne, Paul
    • Chagall, Marc
    • Chihuly, Dale
    • Dali, Salvadore
    • Da Vinci, Leonardo
    • Delaunay, Robert & Sonia
    • Escher, M.C.
    • Goldsworthy, Andy
    • Haring, Keith
    • Johns, Jasper
    • Kahlo, Frida
    • Kandinsky, Wassily
    • Klee, Paul
    • Klimt, Gustave
    • Matisse, Henri
    • Miro, Joan
    • Mondrian, Piet
    • Monet, Claude
    • O’Keeffe, Georgia
    • Old Masters
    • Picasso, Pablo
    • Pollock, Jackson
    • Pompon, Francois
    • Posada, Jose
    • Remington, Frederick
    • Renoir, Auguste
    • Seurat, Georges
    • Seuss, Dr.
    • Van Gogh, Vincent
    • Van Honthorst, Gerard
    • Wood, Grant
  • Lessons by Holiday
    • 100th Day of School
    • Chinese New Year
    • Christmas
    • Day of the Dead / Dia de los Muertos
    • Earth Day
    • Easter
    • Father’s Day
    • Halloween
    • International Dot Day
    • Memorial Day
    • Mother’s Day
    • New Years
    • Other
    • Thanksgiving
    • Valentine’s Day
  • Lessons by Culture
    • Africa
    • America
    • Chile
    • China
    • Europe
    • Haiti
    • Japan
    • Mexico
    • Middle East
  • Lessons by Process
    • 3D / Sculpture
    • Bookmaking
    • Calligraphy
    • Collage
    • Drawing
    • Embossing
    • Folding
    • Lettering
    • Micrography
    • Mosaic
    • Origami
    • Painting
    • Paper Cutting
    • Paper Folding
    • Printmaking
    • Quilling
    • Recycling with Art
    • Sketching
    • Stitching / Embroidery
    • Weaving
  • Lessons by Medium
    • Acrylic
    • Clay
    • Colored Pencil
    • Crayon
    • Digital / Computer
    • Fabric / Fiber
    • Markers / Pen and Ink
    • Mixed Media
    • Oil Pastel
    • Paper
    • Pencil
    • Tempera
    • Watercolor
  • Lessons by Style
    • Abstract (Non-representational)
    • Abstract (Representational)
    • Cartoon
    • Cubism
    • Expressionism
    • Fantasy
    • Impressionism
    • Op Art
    • Orphism
    • Pointillism
    • Pop Art
    • Post Impressionism
    • Realism
    • Surrealism
  • Lessons by Subject
    • Abstract Design
    • Animals
    • Birds
    • Buildings
    • Butterflies
    • Cityscape
    • Color / Color Mixing
    • Creatures / Monsters
    • Cross
    • Faith
    • Elements of Art
    • Fish / Marine Life
    • Flowers
    • Greeting Cards
    • Hearts
    • Imagination
    • Landscape
    • Mandalas
    • Masks
    • Math with Art
    • Misc. Subjects
    • Names
    • Nature
    • Ocean / Seascapes
    • People
    • Portraits / Self-Portraits
    • Religion
    • Quilts
    • Scripture
    • Seasons
    • Sky
    • snow
    • Stars
    • Still Life
    • Trees
    • Words / Letters
  • … and More!
    • Bulletin Boards & Displays
    • Classroom Management
    • Elements of Art
    • Imagination
    • Inspiration
    • Middle School Art
    • News & Announcements
    • Philosophy
    • Portfolios
    • Product Reviews
    • Quotes & Stories
    • Supplies / Products
    • Teacher Workshops
    • Tips for Teaching Art

Follow me on
Teachers Pay Teachers

Support Teach Kids Art When you shop Amazon.com

TEACH KIDS ART IS AN AMAZON AFFILIATE. I earn a small commission when you visit Amazon.com by clicking through my site and make a purchase of any kind. This supports Teach Kids Art at no extra cost to you.

Click here to shop Amazon.com!

Related Posts

  • Review the Elements of Art with a Beachball Scavenger Hunt
  • Make a Crazy Crown Craft
  • Use Art Postcards to Teach or Review
  • How to Have an Elements of Art Scavenger Hunt in a Painting
  • Colorful Paper Flowers for Cinco De Mayo

Copyright © 2022 Cheryl Trowbridge / Teach Kids Art · All Rights Reserved · Privacy Policy · Design by Laugh Eat Learn


We use cookies on our website to give you the most relevant experience by remembering your preferences and repeat visits. By clicking “Accept”, you consent to the use of ALL the cookies.
Cookie settingsACCEPT
Privacy & Cookies Policy

Privacy Overview

This website uses cookies to improve your experience while you navigate through the website. Out of these, the cookies that are categorized as necessary are stored on your browser as they are essential for the working of basic functionalities of the website. We also use third-party cookies that help us analyze and understand how you use this website. These cookies will be stored in your browser only with your consent. You also have the option to opt-out of these cookies. But opting out of some of these cookies may affect your browsing experience.
Necessary
Always Enabled
Necessary cookies are absolutely essential for the website to function properly. This category only includes cookies that ensures basic functionalities and security features of the website. These cookies do not store any personal information.
Non-necessary
Any cookies that may not be particularly necessary for the website to function and is used specifically to collect user personal data via analytics, ads, other embedded contents are termed as non-necessary cookies. It is mandatory to procure user consent prior to running these cookies on your website.
SAVE & ACCEPT