TeachKidsArt

a resource for teachers & families

  • Home
  • Blog
  • Artist Birthdays
  • SHOP TPT
  • About
  • Contact
  • TIP Vault

Easy Envelopes for Handmade Cards

By Cheryl Trowbridge 17 Comments

Share
Pin
Tweet
Print
It’s easy to make custom envelopes for your handmade cards – perfect for those non-traditional sizes! You can get creative with unique papers and decorative liners, too. Kids will catch on quickly since they don’t even need to measure their paper…. they just need to understand the concept of starting with a square that’s a little bit larger than the card.
 
Directions:
(Note: I’m giving specific measurements for those who want them, but the beauty of these envelopes is that you can make them without measuring! Even the liners can be made just by ‘eyeballing’ the size needed. You don’t need to be exact…. close enough is good enough here!)
1. Start with a square piece of paper that’s just a little larger than your card on each side. Turn the square so its corners point up and down, and right and left (like a diamond). Then center your card on the square. (If you make your card from an 8 1/2” x 11” or 9” x 12” paper folded in half, then a 12” x 12” square will work perfectly for the envelope. For a small 4” x 5” card, a 7” x 7” square will work well.)
2. Fold each corner over the card, beginning with one of the shorter sides and ending with one of the longer sides. If you lightly “score” your envelope (with your fingernail or a paper clip) along the edges of the card it will make it easier to fold.
3. Remove the card and unfold your envelope. Cut away the triangles where the fold lines cross.  You can round the top corner with scissors if you want.
4. Now fold the sides in and fold the bottom flap up over them. Cut the point off the bottom flap (if you want), and glue the edges of the bottom flap to the lower edges of the side flaps.
5. To finish, put your card back inside and glue the top down or seal it closed with a sticker.


To line your envelope (optional)….
(Note: Once again, you can totally do this without measuring, just by laying the liner on top of the finished envelope and eyeballing the amount to fold back and cut!)
1. Measure the width of your envelope, and subtract about 1/4 inch so the liner will fit easily inside. For the length, open up the flap of the envelope, and measure from the bottom fold of your envelope to about ¾” below the point. Cut your lining paper to this size. (To line an envelope for a 6”x9” card, cut your liner paper to 8 ¾” x 10 ¼”.)
2. Next, slide the lining paper into the envelope, and fold down the upper left and right edges of the liner about ¾” inside the edges of the envelope flap, to allow a space for gluing your envelope closed. Crease well. Remove the lining paper and cut along the fold lines.
3. Insert the liner into your envelope and fold it down along the flap fold. Place a piece of scrap paper between the liner flap and the body of the envelope to protect the back of the envelope from glue. Finally, glue the back of the liner to the inside of the envelope flap.
4. Fold the envelope flap over the liner, and rub well. Lift flap and remove the scrap paper.
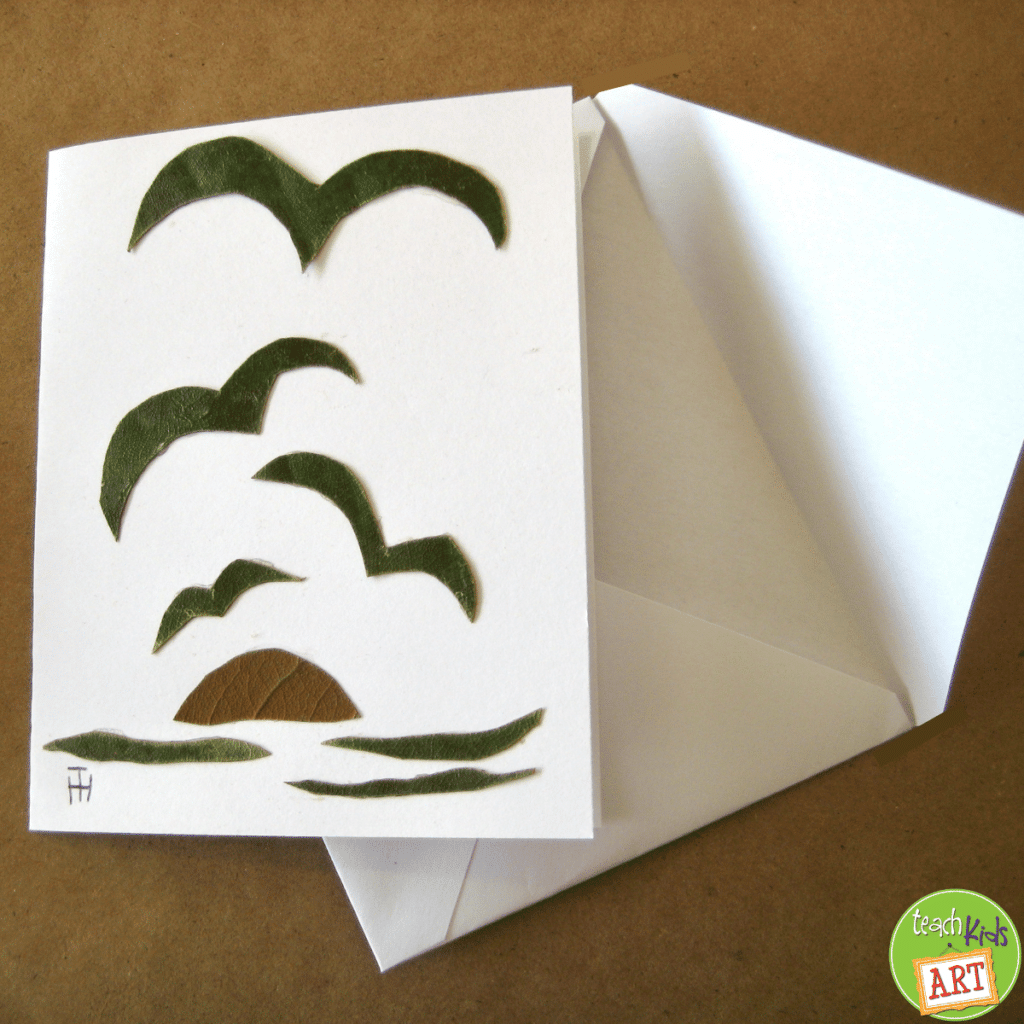
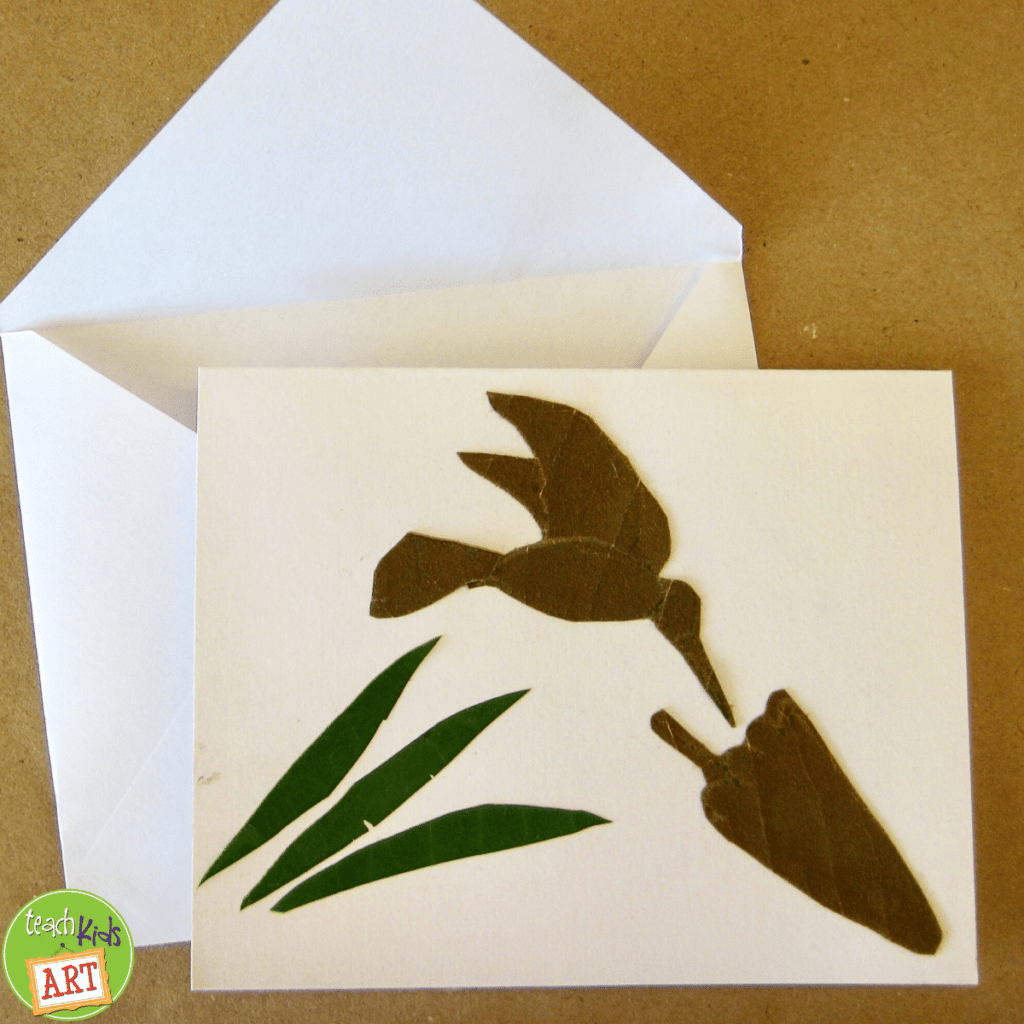
Collaged card with a custom envelope, inspired by the art of Haiti!


Share
Pin
Tweet
Print

You may also like...

Default ThumbnailHand-Made Envelopes Default ThumbnailRecycled Magazine Flowers Default Thumbnail“3D” Flower Collage Default ThumbnailCut Paper Symmetry “Pop-Out” Card

Filed Under: Greeting Cards, Lessons, Paper Tagged With: cards, envelopes, Haiti

Comments

  1. Kathy says

    at

    Those are great tips for making envelopes! I like the fact that the square works for rectangular cards. It's wonderful that no template is needed.

    Reply
  2. Krissa says

    at

    Yay! This is just what I needed…

    Reply
  3. Semi`nin Mutlu Elleri says

    at

    Thanks a lot, great! As soon as possible I`ll try this with my kids:)

    Reply
  4. Rizwan Ali says

    at

    This is very unique idea to make cards like this and also nice info has been shared.
    Hotel Key Card
    membership card

    Reply
  5. Janice says

    at

    I just started making cards, this is what I have been looking for, thanks

    Reply
  6. Kate says

    at

    Thank you – you made it easy.

    Reply
  7. Carrie says

    at

    I have to admit, I was looking for a template but decided to try this anyway – LOVE IT! I’m so excited to finish my project! I do have one question, would it be easier to line the envelopes before gluing together? Thanks for sharing!

    Reply
    • Cheryl Trowbridge says

      at

      Carrie, the reason I don’t offer a template for envelopes is because you would have to have a separate template for each size card. But when you custom-make your envelopes, they will fit any size card perfectly! And it’s easier than it sounds! I just re-worded my directions for the liner to make it a little more clear. Someday I’ll do a photo tutorial for this, but until then I hope this helps! It’s actually easier to glue the envelope before making the liner. The way I make the liner, it just slides in and stops at the bottom of the envelope, so it actually requires less paper, too.

      Reply
  8. Jill H. says

    at

    Hi! Does this idea work for square cards, too? Would you use just a bigger square for the envelope?
    Btw, thanks so much for sharing! :-)

    Reply
    • Cheryl Trowbridge says

      at

      Yes, Jill, the same principle applies to square cards! It’s adaptable to any size or shape!

      Reply
  9. Alyssa says

    at

    This does not work!

    Reply
    • Cheryl Trowbridge says

      at

      Alyssa, I’m sorry you’re having trouble with this… what part isn’t working for you? If you’re referring to the square card, the only thing you do differently is that you don’t need to trim the bottom corner before folding it up, so that’s one less step! Let me know what you’re having trouble with and I’ll try to help… it really does work!!

      Reply
  10. Bonnie says

    at

    I make most of my cards 5×7 and finally am running out of garage sale envelopes so decided to try this. I started with 12×12 paper with print on one side (for the inside of the envelope). I had to do some extra cutting until I figured out what I think I was doing wrong – next time I will start with 11×11 paper, which seems to come out just about right for my 5×7 size. Thanks so much for sharing this idea – it will also be good for using up some of my scrapbook paper that I don’t really like.

    Reply
  11. kk says

    at

    this is really hard. the steps are not explained good so that makes it really hard to do!

    Reply
    • Cheryl Trowbridge says

      at

      Thanks for your comment! I’m so sorry you’re finding this hard to do, kk. I think step-by-step photos would help. I’m planning to make a free TpT resource for this that I think will make it more clear. You can follow me on my TpT store or subscribe to my blog posts to be notified when it’s available.

      Reply

Trackbacks

  1. Easy DIY Envelopes to Fit Any Size Card | TeachKidsArt says:
    at

    […] it’s easy to make a cus­tom enve­lope for any card with no mea­sur­ing nec­es­sary! Click here for the com­plete […]

    Reply
  2. How to Make Handmade Envelopes {With Homemade Envelope Glue} says:
    at

    […]  Envelope templates seemed the simpler route.  However, if you have something unusually shaped making your own template may be the route to go.  Here’s some of the free envelope templates that I used in the […]

    Reply

Leave a Reply Cancel reply

Your email address will not be published. Required fields are marked *

This site uses Akismet to reduce spam. Learn how your comment data is processed.

Follow Me

  • Instagram
  • Pinterest
  • RSS
  • Twitter

Never Miss a Post - Follow by Email

Find a ** FREE ** Lesson (Below):

  • Lessons Inspired by Famous Artists
    • Britto, Romero
    • Burch, Laurel
    • Calder, Alexander
    • Carle, Eric
    • Cezanne, Paul
    • Chagall, Marc
    • Chihuly, Dale
    • Dali, Salvadore
    • Da Vinci, Leonardo
    • Delaunay, Robert & Sonia
    • Escher, M.C.
    • Goldsworthy, Andy
    • Haring, Keith
    • Johns, Jasper
    • Kahlo, Frida
    • Kandinsky, Wassily
    • Klee, Paul
    • Klimt, Gustave
    • Matisse, Henri
    • Miro, Joan
    • Mondrian, Piet
    • Monet, Claude
    • O’Keeffe, Georgia
    • Old Masters
    • Picasso, Pablo
    • Pollock, Jackson
    • Pompon, Francois
    • Posada, Jose
    • Remington, Frederick
    • Renoir, Auguste
    • Seurat, Georges
    • Seuss, Dr.
    • Van Gogh, Vincent
    • Van Honthorst, Gerard
    • Wood, Grant
  • Lessons by Holiday
    • 100th Day of School
    • Chinese New Year
    • Christmas
    • Day of the Dead / Dia de los Muertos
    • Earth Day
    • Easter
    • Father’s Day
    • Halloween
    • International Dot Day
    • Memorial Day
    • Mother’s Day
    • New Years
    • Other
    • Thanksgiving
    • Valentine’s Day
  • Lessons by Culture
    • Africa
    • America
    • Chile
    • China
    • Europe
    • Haiti
    • Japan
    • Mexico
    • Middle East
  • Lessons by Process
    • 3D / Sculpture
    • Bookmaking
    • Calligraphy
    • Collage
    • Drawing
    • Embossing
    • Folding
    • Lettering
    • Micrography
    • Mosaic
    • Origami
    • Painting
    • Paper Cutting
    • Paper Folding
    • Printmaking
    • Quilling
    • Recycling with Art
    • Sketching
    • Stitching / Embroidery
    • Weaving
  • Lessons by Medium
    • Acrylic
    • Clay
    • Colored Pencil
    • Crayon
    • Digital / Computer
    • Fabric / Fiber
    • Markers / Pen and Ink
    • Mixed Media
    • Oil Pastel
    • Paper
    • Pencil
    • Tempera
    • Watercolor
  • Lessons by Style
    • Abstract (Non-representational)
    • Abstract (Representational)
    • Cartoon
    • Cubism
    • Expressionism
    • Fantasy
    • Impressionism
    • Op Art
    • Orphism
    • Pointillism
    • Pop Art
    • Post Impressionism
    • Realism
    • Surrealism
  • Lessons by Subject
    • Abstract Design
    • Animals
    • Birds
    • Buildings
    • Butterflies
    • Cityscape
    • Color / Color Mixing
    • Creatures / Monsters
    • Cross
    • Faith
    • Elements of Art
    • Fish / Marine Life
    • Flowers
    • Greeting Cards
    • Hearts
    • Imagination
    • Landscape
    • Mandalas
    • Masks
    • Math with Art
    • Misc. Subjects
    • Names
    • Nature
    • Ocean / Seascapes
    • People
    • Portraits / Self-Portraits
    • Religion
    • Quilts
    • Scripture
    • Seasons
    • Sky
    • snow
    • Stars
    • Still Life
    • Trees
    • Words / Letters
  • … and More!
    • Bulletin Boards & Displays
    • Classroom Management
    • Elements of Art
    • Imagination
    • Inspiration
    • Middle School Art
    • News & Announcements
    • Philosophy
    • Portfolios
    • Product Reviews
    • Quotes & Stories
    • Supplies / Products
    • Teacher Workshops
    • Tips for Teaching Art

Follow me on
Teachers Pay Teachers

Support Teach Kids Art When you shop Amazon.com

TEACH KIDS ART IS AN AMAZON AFFILIATE. I earn a small commission when you visit Amazon.com by clicking through my site and make a purchase of any kind. This supports Teach Kids Art at no extra cost to you.

Click here to shop Amazon.com!

Related Posts

  • TIP #65: 12 Positive Affirmations for Creative Kids
  • Review the Elements of Art with a Beachball Scavenger Hunt
  • Make a Crazy Crown Craft
  • Use Art Postcards to Teach or Review
  • How to Have an Elements of Art Scavenger Hunt in a Painting

Copyright © 2023 Cheryl Trowbridge / Teach Kids Art · All Rights Reserved · Privacy Policy · Design by Laugh Eat Learn


We use cookies on our website to give you the most relevant experience by remembering your preferences and repeat visits. By clicking “Accept”, you consent to the use of ALL the cookies.
Cookie settingsACCEPT
Privacy & Cookies Policy

Privacy Overview

This website uses cookies to improve your experience while you navigate through the website. Out of these, the cookies that are categorized as necessary are stored on your browser as they are essential for the working of basic functionalities of the website. We also use third-party cookies that help us analyze and understand how you use this website. These cookies will be stored in your browser only with your consent. You also have the option to opt-out of these cookies. But opting out of some of these cookies may affect your browsing experience.
Necessary
Always Enabled
Necessary cookies are absolutely essential for the website to function properly. This category only includes cookies that ensures basic functionalities and security features of the website. These cookies do not store any personal information.
Non-necessary
Any cookies that may not be particularly necessary for the website to function and is used specifically to collect user personal data via analytics, ads, other embedded contents are termed as non-necessary cookies. It is mandatory to procure user consent prior to running these cookies on your website.
SAVE & ACCEPT